Getting Started in Fright Train
Board the Great White with a clear plan for credits, inventory, and storms.
This Getting Started guide is the onboarding checklist for Fright Train on Steam. If the tutorial felt dense, or you bounced after your first storm, use this page as a calm second briefing from P.A.W. HQ. You will learn the run loop, what to buy early, how heat and inventory work, and which wiki pages to open next.
Fright Train is a single-player third-person survival horror roguelite. You play Doug Barker aboard the L.R.S. Great White as it tears across Antarctica. Your job is not only to shoot monsters — it is to progress through cars, earn credits, maintain the train, and reach extraction before the layout reconfigures or the cold claims you.
The loop in five beats
- Explore the current car for loot, lore, kickable objects, and terminals.
- Earn credits by defeating enemies, shaking or shooting objects, and selling junk.
- Spend credits on door fees, vending supplies, weapon orders, and upgrades.
- Survive storms when the distance tracker shows red markers — clear the locked car.
- Push forward toward the locomotive extraction point while keeping car integrity healthy.
If you only memorize one sentence: movement without maintenance is a delayed game over.
First five minutes checklist
- Confirm your bindings in Controls. Keyboard and mouse are often preferred for inventory speed; controllers work with full support but may feel softer on aim.
- Pick up heat pads when prompted. Open inventory (Tab by default in many demo builds), drag a heat pad into a hand slot, and understand that outside temperature drains while you are exposed.
- Learn item sizes early: small, medium, large, and huge. Huge items usually need the hand slot. That rule alone prevents “why can’t I pick this up?” moments.
- Kick or shoot clutter to fund your first door. Credits are the bloodstream of progression.
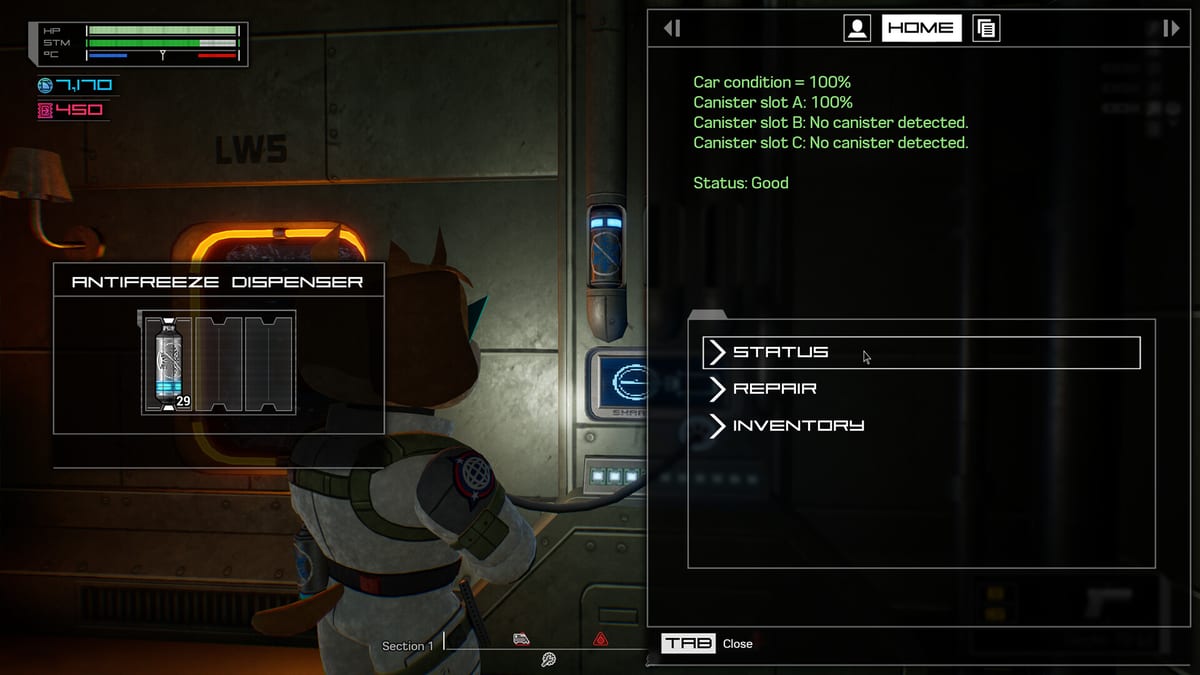
- Find the maintenance terminal in your starting area and glance at car status in the UI corner so you know what “healthy” looks like before storms hit.
Credits, doors, and vending
Credits (often framed as employee points) unlock progress. Many doors charge a one-time fee. That can feel rude on a first demo run, but it is the pacing gate that forces scavenging instead of a straight sprint to the engine.
Vending machines and the paw-patch shopping flow let you buy supplies and order weapons. Ordered gear may arrive on the roof of your current car — budget time and heat pads for the pickup. Before you dump credits into a shiny rifle, skim the Weapons Tier List so you are not financing a dead-end kit.
Sell what you will not use. Inventory space is combat power. A backpack full of novelty snacks is a backpack that cannot hold antifreeze when a car goes critical.
Inventory in one beginner paragraph
Open the full breakdown on Inventory Management. The beginner rule: magazines belong on the chest when you expect a fight. Fetch speed depends on body location. Reloading is two actions — packing bullets into a mag, then seating the mag — so panic reloads punish messy layouts. Double-click transfers help when a crate is open and enemies are not yet in the aisle.
Storms before you “feel ready”
The distance tracker at the bottom of the HUD shows travel progress and storm markers. When a storm begins, you can be locked in the current car until enemies are cleared. Windows and vents become spawn routes unless you close shutters through window terminals. Read Combat and Storms after your first lock-in so the second one is intentional, not chaotic.
Keep the locomotive alive
Car status decays over time and drops harder during storms. Critical cars can stop the train and force outside repairs — the most lethal beginner trap. Preemptive repairs at maintenance terminals and antifreeze inserts are cheaper than a blizzard repair fight. Make Keep the Train Running your mid-run companion page.
Extraction mindset
Runs are not endless corridor tourism. You are racing a living system: enemy pressure, economy, integrity, and reconfiguration. Complete small objectives when they appear — cosmetics and unlocks reward mastery across attempts. Dying is data. Note whether you failed from economy, inventory friction, integrity, or aim, then open the matching guide.
Recommended first-session build
- Starting pistol upgraded at the earliest safe checkpoint rather than ignored.
- One backup close-range option when you can afford it (shotgun-style kits shine in car aisles — see Weapons).
- Heat pads and at least one antifreeze canister reserved, not sold.
- Magazines on chest straps, ammo boxes in a consistent secondary slot.
- A mental rule: repair before greed. One more loot room means nothing if the train stops.
What to read next
- Inventory Management — fix reload speed.
- Keep the Train Running — stop blizzard deaths.
- Combat and Storms — clear lock-ins cleanly.
- Items Tier List — know what is worth pocket space.
- Doug Barker — character and tone context.
- System Requirements — if the game stutters on storm particle spam.
You do not need to master every enemy on day one. You need a stable loop: earn, unlock, maintain, clear, extract. Once that loop is boring, the horror gets fun — and the Enemies page becomes your next obsession.
Frequently Asked Questions
Quick answers for Antarctic agents.
What should I buy first in Fright Train?
Prioritize door progress, heat pads, antifreeze, and a reliable weapon upgrade before luxury cosmetics. Check Weapons before expensive gun orders.
Why did the train stop?
A car likely hit critical integrity. Use maintenance terminals earlier and follow Keep the Train Running.
Can I bring friends into the same run?
No. Fright Train launches as single-player. Improve run knowledge instead of waiting for squad tactics.
Where are the controls listed?
See the dedicated Controls page for keyboard, mouse, and controller notes.